Hobby: Renaming my photos

Its a mess, I know. Soo many pictures and so little time to sort and make sense of them. So I have a project to cleanup in all of my photos, and I make the first task to rename all of the images that I have.

Problem

I have had a number of digital cameras over the years and still use several different today, i.e. one on my phone and one DSLR ( you know a big heave one that always seem to be at home when you need it). They all have a different naming convention all of them, now I want to get them all in one name convention. So I figured that I would use the property “Date taken” and set that as the name of the files.

Date taken property


This property is on every image no matter what camera that I have used. So that’s a good place to start.

Reading property

So that property have to be somewhere right, and I did some googeling and found out that in .Net you have to read the entire file to get that.

public static DateTime GetDateTaken(Image targetImg, FileInfo fileinfo)
{
    try
    {
        //Property Item 36867 corresponds to the Date Taken
        PropertyItem propItem = targetImg.GetPropertyItem(36867);
        DateTime dtaken;

        //Convert date taken metadata to a DateTime object
        string sdate = Encoding.UTF8.GetString(propItem.Value).Trim();
        string secondhalf = sdate.Substring(sdate.IndexOf(" "), (sdate.Length - sdate.IndexOf(" ")));
        string firsthalf = sdate.Substring(0, 10);
        firsthalf = firsthalf.Replace(":", "-");
        sdate = firsthalf + secondhalf;
        dtaken = DateTime.Parse(sdate);
        return dtaken;
    }
    catch (Exception e)
    {
        log.Error("Cannot find property for image: " + fileinfo.FullName, e);
        return DateTime.MinValue;
    }
}

Deciding on a date time pattern

Now this is the hard part. Actually have to decide what to do with this date. After going back and forth, I decided on “yyyy-MM-dd HH.mm.ss”. As a standard “:” is used to do the time part of the date time, but “:” is not allowed as part of a file name so I decided to use “.” instead.

Renaming one file

Now that I have a pattern and one way to read the Date Taken property its time to check if the file already have the correct pattern or else read the property and then rename the file.

Action<FileInfo> renameFileAction = file =>
{
    if (!file.Extension.Equals(".jpg", StringComparison.CurrentCultureIgnoreCase))
        return;

    string name = file.Name.Replace(file.Extension, "");

    DateTime dateTaken;

    // check if the pattern is valid for this file
    if (DateTime.TryParseExact(name, dateFormats, provider, DateTimeStyles.AllowWhiteSpaces, out dateTaken))
        return;

    Image imageToRename = null;
    try
    {
        imageToRename = Image.FromFile(file.FullName);
    }
    catch (OutOfMemoryException)
    {
        log.WarnFormat("Not abel to load as an image: {0}", file.FullName);
        return;
    }
    catch (FileNotFoundException)
    {
        log.WarnFormat("File no longer present: {0}", file.FullName);
        return;
    }
    catch (Exception exception)
    {
        log.Error("Exception when trying to read the file as an Image: " + file.FullName, exception);
        return;
    }

    dateTaken = GetDateTaken(imageToRename, file);

    imageToRename.Dispose();

    if (dateTaken != DateTime.MinValue)
        try
        {
            file.MoveTo(file.Directory.FullName + "\\" + dateTaken.ToString(dateFormats) + file.Extension);
        }
        catch (Exception)
        {
            log.ErrorFormat("File with the same name exists: {0}", file.FullName);
            return;
        }

};

Renaming more than one file at a time

Now I want to point my action to a folder and apply it to every file it the structure, so I created a directory traversing method

public static void DirTraverse(DirectoryInfo dir, Action<FileInfo> action)
{
    log.InfoFormat("Current traversing folder: {0}", dir.FullName);
    try
    {
        foreach (FileInfo fi in dir.GetFiles())
        {
            try
            {
                action(fi);
            }
            catch (System.Exception exception)
            {
                log.Error("Exception when trying to rename the image: " + fi.FullName, exception);
            }
        }

        foreach (DirectoryInfo d in dir.GetDirectories())
        {
            DirTraverse(d, action);
        }
    }
    catch (System.Exception excpt)
    {
        log.Error("Exception when traversing directories, current folder: " + dir.FullName, excpt);
    }
}

There you have it, that’s what I have done this far.

Edit: yeah the complete code: https://github.com/maeg02/RenameImages

Posted in Tea Time | Tagged , , , , , | Leave a comment

Using ClickDimensions to create Emails, an exploratory testing adventure

Using ClickDimensions to create Emails, an exploratory testing adventure
It’s always fun to make new acquaintances, sometimes it’s more fun than others. Creating an email template is easy if you keep it to the paved roads, but it’s when you go off road the real fun stuff happens.

So I was given that task of getting data to an email template to ClickDimensions, so I thought that sounded easy enough, well there was a hook to it (there always is when I’m GIVEN a task 🙂 ).

Consider this scenario, a customer orders something and you want to send them confirmation email greeting the customer and confirming everything. So you want to add some data that is not related to customer directly and instead is on your custom entity, with some other details that you want to present in a table like fashion. What if you have your custom entity, let’s call it new_order and you have details new_orderdetail in a 1:N relationship from order to order details.

This can be done using ClickDimensions and the templating engine that they use called FreeMarker. Since I wasn’t sure how to use these tools together I turned to their support and got good response with a blog post that they have done themselves. Great!

http://blog.clickdimensions.com/2011/10/merge-any-custom-or-standard-entity-data-into-clickdimensions-emails.html

However this is from 2011 and as of this blog post it’s October of 2014.
The principals are the same, add connections to your Email Send record and then manually add FreeMarker template markup to get the data into the email itself.
To my example email, I wanted to do something like this:
“Hi Account.Name
We have received your order {new_order.name} this is including:
<Table of new_orderdetail>
{new_orderdetail.name} {new_orderdetail.amount}
</Table of new_order>”
The first part was straight forward, however the table part was not so easy. Now this is what I figured out. FreeMarker has to somehow “expand” the attributes that you are going to use before you loop them. I’m not sure why. But this worked for me:

“Hi ${Recipient.account.name}
We have received your order ${Recipient.new_order.new_name}, this is including:
<#list ${Recipient.new_orderdetail.new_name as orderdetail></#list>
<#list ${Recipient.new_orderdetail.new_amount as orderdetail></#list>
<table>
<#list ${Recipient.new_orderdetail as orderdetail>
<tr>
<td>${orderdetail.new_name}</td>
<td>${orderdetail.new_amount}</td>
</tr>
</#list>
</table>”

So if I excluded one of the leading“<#list” commands like this one
“<#list ${Recipient.new_orderdetail.new_name as orderdetail>”
then I would get an error saying “Error: ‘new_orderdetail’ entity doesn’t contain attribute with Name = ‘new_name’.” Now you know how to make your template work.

Posted in MS CRM | Tagged , , | 1 Comment

Adding Dynamics CRM Service account as a CRM user

Noooooooo, what have I done! That was what I thought, when I realized what I had just done. Now let’s take it from the beginning.

I was looking for a service account in the AD and found one called CRM Service account and I thought, great let’s use that for testing. So I went and added that as a user to an organization development organization here at work. But just as I pressed save I got a strange error message back that said that I did not have any roles and that I cannot view the record. Strange… asked my colleague to check if he could help me, but no. He got the same error message! Then it hit me, I just added the account running the app pool in IIS to be a CRM User, nooooo!

No one could access that organization any more, and trying to do a trace said:

SecLib::RetrievePrivilegeForUser failed – no roles are assigned to user. Returned hr = -2147209463, User: [userid]

But checking the database clearly stated that I had roles still. Searching for the error message I found a KB: http://support2.microsoft.com/kb/2500917 and that clearly states:

By default, when a CRM user is created in Microsoft Dynamics CRM, the user has no security roles. Because the CRM service account is mapped with the newly created user, the CRM service account cannot operate anything. Therefore, the system crashes.

This behavior is by design. Making the account that is running the CRMAppPool into a Microsoft Dynamics CRM user is not supported.

and there was a Resolution, but it was not very helpful:

Keep the CRM service account as a dedicated service account.

Trying to find if someone have managed to solve this before I found this from 2012: http://crmbusiness.wordpress.com/2012/02/03/crm-2011-license-error-the-selected-user-has-not-been-assigned-a-security-role/

Here Ben Hosking is trying to go about it by changing the service account, but that means that all organizations will be affected, at least for a short while. But since this is local, we have development going on, on other organizations and I did want to make a bigger mess. So I chose a more dangerous path J. Removing the user I just added.

Now before you go down this path, ask yourself, if this organization will be completely unrecoverable will you be ok? In my case since it was a development environment and the data was not important, and all customizations was in TFS I was fine with that option too. So I started to create a new organization just in case everything blows to pieces.

I started with localizing the Guid the new user had, and then used a script to search for that value inside the database. I used this: http://gallery.technet.microsoft.com/scriptcenter/c0c57332-8624-48c0-b4c3-5b31fe641c58 with a tweak (of course).  Where they are specifying that they are looking inside “WHERE STY.name in (‘varchar’,’char’,’nvarchar’,’nchar’,’text’)” I changed that to just uniqueidentifier instead. That listed a bunch of tables and columns with the data in it. I did this for both the organization database and the MSCRM_CONFIG.

So I created a short delete script and tried it, this is what I came up with:


delete from usersettingsbase
where SystemUserId = '0585361D-083F-E411-B71B-005056AB641F'

delete from QueueMembership
where SystemUserId = '0585361D-083F-E411-B71B-005056AB641F'

delete from TeamMembership
where SystemUserId = '0585361D-083F-E411-B71B-005056AB641F'

delete from SystemUserPrincipals
where SystemUserId = '0585361D-083F-E411-B71B-005056AB641F'

delete from SystemUserPrincipals
where SystemUserId = '0585361D-083F-E411-B71B-005056AB641F'

delete from PrincipalObjectAccess
where PrincipalId = '0585361D-083F-E411-B71B-005056AB641F'

delete from QueueBase
where OwnerId = '0585361D-083F-E411-B71B-005056AB641F'

delete from ResourceBase
where ResourceId = '0585361D-083F-E411-B71B-005056AB641F'

delete from MailboxBase
where OwnerId = '0585361D-083F-E411-B71B-005056AB641F' OR RegardingObjectId = '0585361D-083F-E411-B71B-005056AB641F'

delete from InternalAddressBase
where ParentId = '0585361D-083F-E411-B71B-005056AB641F'

delete RB from CalendarRuleBase RB
INNER JOIN CalendarBase B on B.CalendarId = RB.CalendarId
where PrimaryUserId = '0585361D-083F-E411-B71B-005056AB641F'

delete from CalendarBase
where PrimaryUserId = '0585361D-083F-E411-B71B-005056AB641F'

delete from OwnerBase
where OwnerId = '0585361D-083F-E411-B71B-005056AB641F'

delete from SystemUserBase
where SystemUserId = '0585361D-083F-E411-B71B-005056AB641F'

delete from MSCRM_CONFIG..SystemUserOrganizations
where CrmUserId = '0585361d-083f-e411-b71b-005056ab641f'

And voila the organization started again.
Now do you ask yourself if this is support?

You are kidding right?
Of course not!

Posted in MS CRM | Tagged , , | 5 Comments

Converting Workflow counter to CRM 2013

Time flies and Dynamics CRM gets updated to a new version, the workflow engine of Dynamics is almost the same as it has been. However since the code on the last entry of this in the blog is in CRM 4 the gap is a little bit bigger. Let’s start with the basics, we need a class that inherits from CodeActivity and then an input and an output.

public sealed class NumberOfRunningWorkflows : CodeActivity
{
	[Input("Optional workflow reference")]
	[ReferenceTarget("workflow")]
	public InArgument<EntityReference> WorkflowReference { get; set; }

	[Output("Number of Running workflows (will include this)")]
	public OutArgument<int> NumberOfRunning { get; set; }

I have included a Tracing Service to this, and that is actually not necessary but great for debugging, not so much in development where you attach to the process anyway but those edge cases that you might have missed that come up in production. If the workflow cashes you get the trace from the session with you. I.e. if you are returning a null value as an output from your code activity and your workflow doesn’t check for that, you can have logged the incoming parameters for your code activity to sort out your bug.

/// <summary>
/// Executes the workflow activity.
/// </summary>
/// <param name="executionContext">The execution context.</param>
protected override void Execute(CodeActivityContext executionContext)
{
	// Create the tracing service
	ITracingService tracingService = executionContext.GetExtension<ITracingService>();

	if (tracingService == null)
	{
		throw new InvalidPluginExecutionException("Failed to retrieve tracing service.");
	}

	tracingService.Trace("Entered NumberOfRunningWorkflows.Execute(), Activity Instance Id: {0}, Workflow Instance Id: {1}",
		executionContext.ActivityInstanceId,
		executionContext.WorkflowInstanceId);

	// Create the context
	IWorkflowContext context = executionContext.GetExtension<IWorkflowContext>();

	if (context == null)
	{
		throw new InvalidPluginExecutionException("Failed to retrieve workflow context.");
	}

	tracingService.Trace("NumberOfRunningWorkflows.Execute(), Correlation Id: {0}, Initiating User: {1}",
		context.CorrelationId,
		context.InitiatingUserId);

	IOrganizationServiceFactory serviceFactory = executionContext.GetExtension<IOrganizationServiceFactory>();
	IOrganizationService service = serviceFactory.CreateOrganizationService(context.UserId);

	try
	{
		CountNumberOfRunningWorkflows(executionContext,service,context);
	}
	catch (FaultException<OrganizationServiceFault> e)
	{
		tracingService.Trace("Exception: {0}", e.ToString());

		// Handle the exception.
		throw;
	}

	tracingService.Trace("Exiting NumberOfRunningWorkflows.Execute(), Correlation Id: {0}", context.CorrelationId);
}

Then let’s check if there was a workflow given, otherwise let’s get the current one.

private void CountNumberOfRunningWorkflows(CodeActivityContext executionContext,IOrganizationService service, IWorkflowContext context)
{
EntityReference worflowReference = WorkflowReference.Get(executionContext);
if (worflowReference == null)
{
worflowReference = new EntityReference("workflow", executionContext.WorkflowInstanceId);
}

Now it’s really simple just to query for workflows that exists on this record.

QueryExpression runningsWorflowQuery = new QueryExpression("asyncoperation");
runningsWorflowQuery.Criteria.AddCondition("statuscode", ConditionOperator.In, 0, 10, 21, 20);
runningsWorflowQuery.Criteria.AddCondition("workflowactivationid", ConditionOperator.Equal, worflowReference.Id);
runningsWorflowQuery.Criteria.AddCondition("regardingobjectid", ConditionOperator.Equal, context.PrimaryEntityId);

EntityCollection runningWorflowsCollection = service.RetrieveMultiple(runningsWorflowQuery);

NumberOfRunning.Set(executionContext, runningWorflowsCollection.Entities.Count);

There’s a workflow counter for you, done!

Posted in MS CRM | Tagged , , , | 3 Comments

CRM 2013 – First Glimpse

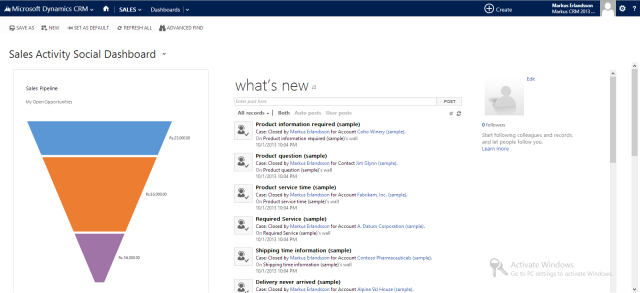
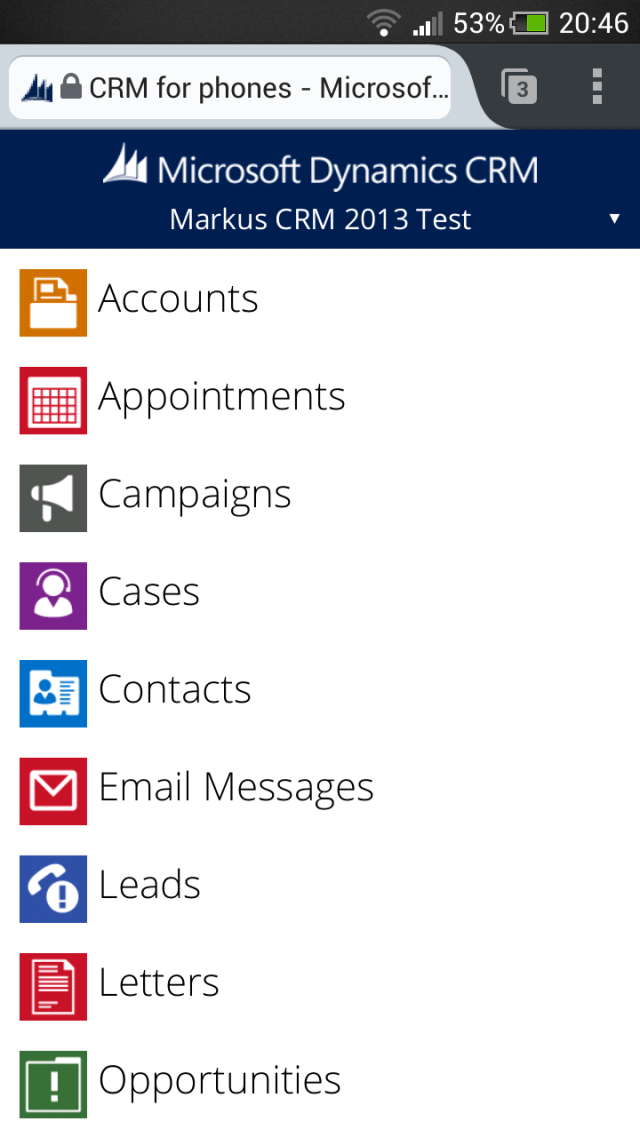
So Dynamics CRM 2013 is live online. I just had to check it out and get a feeling for the new version my self, therefore I signed up for a new 30 day trial in India. Because I have read that Microsoft have only upgrade the Asian-Pacific center, that was a while ago, perhaps you get CRM 2013 with every new trial that you start. I got my Dynamics CRM 2013 anyway.

So I started my iPad Mini and My Andriod Phone since I wanted to get a feeling on most devices and it works great. However I could not find any of the official apps yet, not for Windows 8 or for the iPad.

Windows 8 with Chrome

windows-CRM2013

Android with Firefox

andoid-CRM2013

iPad Mini with Safari

iPad-CRM2013

First question on tablet and computer is, where are the menus. They have now moved to the top, to make more space on the screen. That makes a lot of sense, especially on the tablet where screen space is precious, then to make the computer experience the same as on a tablet that had to go to. It’s a “mobile first design” and it works.

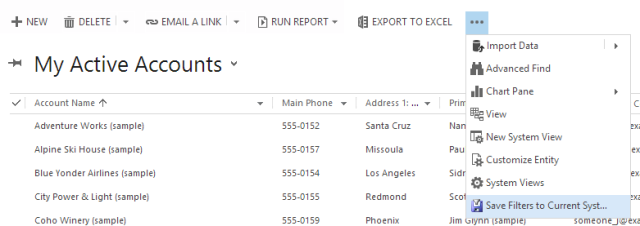
But where are all the other options?

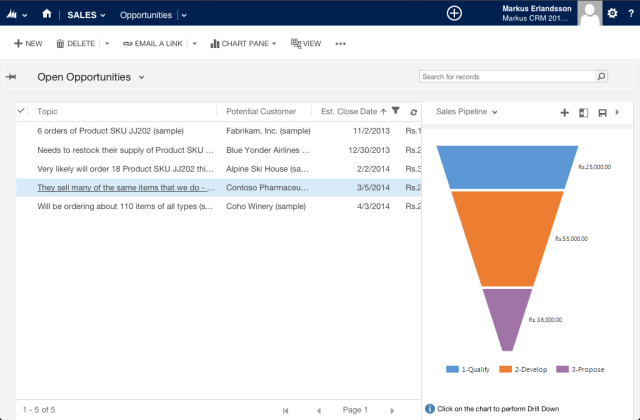
On the computer you get this (when you don’t have an account selected):

more options

But that is device dependent, on your iPad, you can only see “New SystemView” and “System Views”.

Where are my “pop ups”?

The really good thing that are changed are that, every time you open a new Form there is no “pop up” with a new window to handle that. I know that some users have really gone mad over “pop up heaven” :). Now they are replaced with a change in the current window, I will just have to find my “back” button in my browser again.

Posted in MS CRM | Tagged , , | Leave a comment

Start mulitple workflows on related records

A long time ago I wrote a blog post about starting multiple workflows on related records, but this was back in CRM 4 and only supported One-To-Many relationships. So I thought that it was time to update it to CRM 2011 and add support for Many-To-Many relationships.

So let’s start with some simple parameters just like last time:

[Input("Workflow")]
[ReferenceTarget("workflow")]
public InArgument<EntityReference> WorkflowLookup { get; set; }

[Input("Relationship name")]
public InArgument<string> RelationshipName { get; set; }

And then a bit more code to handle both one to many and many to many, so let’s figure out what kind of relationship we have and do everything we have to do with the context:

protected override void Execute(CodeActivityContext executionContext)
{
    string relationshipName = RelationshipName.Get<string>(executionContext);
    EntityReference workflowLookup = WorkflowLookup.Get<EntityReference>(executionContext);

    if (string.IsNullOrEmpty(relationshipName) || workflowLookup == null)
        return;

    IWorkflowContext context = executionContext.GetExtension<IWorkflowContext>();
    IOrganizationServiceFactory serviceFactory = executionContext.GetExtension<IOrganizationServiceFactory>();
    IOrganizationService service = serviceFactory.CreateOrganizationService(context.UserId);

    RetrieveRelationshipRequest retrieveRelationReq = new RetrieveRelationshipRequest();
    retrieveRelationReq.Name = relationshipName;
    retrieveRelationReq.RetrieveAsIfPublished = false;
    RetrieveRelationshipResponse relationResp = service.Execute(retrieveRelationReq) as RetrieveRelationshipResponse;
    switch (relationResp.RelationshipMetadata.RelationshipType)
    {
        case RelationshipType.ManyToManyRelationship:
            {
                ManyToManyRelationshipMetadata retrievedRelationship = relationResp.RelationshipMetadata as ManyToManyRelationshipMetadata;
                StartMultipleChildWorkflowManyToMany(service, retrievedRelationship, workflowLookup.Id, context.PrimaryEntityId, context.PrimaryEntityName);
            }
            break;
        case RelationshipType.OneToManyRelationship:
            {
                OneToManyRelationshipMetadata retrievedRelationship = relationResp.RelationshipMetadata as OneToManyRelationshipMetadata;
                StartMultipleChildWorkflowOneToMany(service, retrievedRelationship, workflowLookup.Id, context.PrimaryEntityId);
            }
            break;
        default:
            break;
    }

}

Now just pass along the service reference to CRM and whatever we might need to figure out how to get all the relations:

private void StartMultipleChildWorkflowManyToMany(IOrganizationService service, ManyToManyRelationshipMetadata retrievedRelationship, Guid workflowId, Guid parentEntityId, string parentEntityName)
{
 string referencingEntity = retrievedRelationship.IntersectEntityName;
 string referencingAttribute;
 string referencedAttribute;

 if (parentEntityName.Equals(retrievedRelationship.Entity1LogicalName))
 {
 referencingAttribute = retrievedRelationship.Entity1IntersectAttribute;
 referencedAttribute = retrievedRelationship.Entity2IntersectAttribute;
 }
 else
 {
 referencingAttribute = retrievedRelationship.Entity2IntersectAttribute;
 referencedAttribute = retrievedRelationship.Entity1IntersectAttribute;
 }

 StartWorkflowCommon(service, referencingEntity, referencingAttribute, workflowId, parentEntityId, referencedAttribute);
}

private void StartMultipleChildWorkflowOneToMany(IOrganizationService service, OneToManyRelationshipMetadata retrievedRelationship, Guid workflowId, Guid parentEntityId)
{
 string referencingEntity = retrievedRelationship.ReferencingEntity;
 string referencingAttribute = retrievedRelationship.ReferencingAttribute;

 StartWorkflowCommon(service, referencingEntity, referencingAttribute, workflowId, parentEntityId, null);
}

Now just get the entities that we need and start the workflow:

private void StartWorkflowCommon(IOrganizationService service, string referencingEntity, string referencingAttribute, Guid workflowId, Guid parentEntityId, string manyToManyAttributeName)
{
 ExecuteWorkflowRequest startWorkflow = new ExecuteWorkflowRequest();
 startWorkflow.WorkflowId = workflowId;

 QueryExpression query = new QueryExpression(referencingEntity);
 query.Criteria.AddCondition(referencingAttribute, ConditionOperator.Equal, new object[] { parentEntityId });
 if (!string.IsNullOrEmpty(manyToManyAttributeName))
 query.ColumnSet.AddColumn(manyToManyAttributeName);

 EntityCollection retChildrenResp = service.RetrieveMultiple(query);

 foreach (Entity child in retChildrenResp.Entities)
 {
 if (string.IsNullOrEmpty(manyToManyAttributeName))
 startWorkflow.EntityId = child.Id;
 else
 {
 startWorkflow.EntityId = (Guid)child.Attributes[manyToManyAttributeName];
 }

 ExecuteWorkflowResponse startworkflowResp = service.Execute(startWorkflow) as ExecuteWorkflowResponse;
 }
}
Posted in CRM 2011, Workflow | Tagged , , | 3 Comments

TypeScript

Working with Javascript can sometimes be a real pain, I find that when my script grow beyond a certain size it can be hard to remember what all the parameters are in my functions.

To make life a little easier you can apply TypeScript to your code and there by push the limit when things get out of hands a little bit further.

If you don’t know what TypeScript is, it’s a “typed superset of JavaScript that compiles to plain JavaScript” check it out at: http://www.typescriptlang.org/.

I will use the the Visual Studio 2012 with the CRM Developer Tool Kit and the TypeScript tool. The later you can get here: http://go.microsoft.com/fwlink/?LinkID=266563.

Script webresourceStart in your Dynamics CRM development organization. Create the web-resource that you want to import:

I like to create virtual folders and keep it tidy.

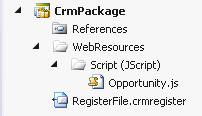
Now import your newly created resource into your development project in Visual Studio. Open CRM Explorer and go to Web Resources -> Script (JScript) and add the file. In my case it says “Opportunity Form Script”.

Solution Explorer Opportunity.jsNow you have the Script in your Solution Explorer and it should look like this:

Up to this point it’s just a standard script library and you can use it like this, but you don’t have any of the TypeScript improvements.

So its time we got a definition file for Dynamics CRM that contains the methods for scripting.  Go to https://crm2011typescript.codeplex.com/ and download the file, you can find it directly here: https://crm2011typescript.codeplex.com/SourceControl/latest#TypeScriptHTMLApp1/Xrm.d.ts.

Put the file in your Script folder where you have your other javascript files. Then I add it as as a Solution Item, right click your solution and go to Add -> Existing Item…

Then change your js file in your team explorer to a typescript file, do this by simply changing the file extension to ts. Wait a couple of seconds and you will see two new files under your .ts file. Now we have to do small project hack in Visual Studio to change what file gets uploaded to CRM when you hit deploy, because now when we just changed the extension. Visual Studio will upload the .ts file. Open your CrmPackage.csproj in a text editor and move the tags DisplayName, UniqueName and WebresourceType to your js file.

It should look like this when you are done:

Package xml fixed

Now you are ready to go:

Typescipt IntelliSense

All of your types are now checked and get things sorted out.
Well this is all good and that, but what do you do with all of your unsupported customization? Because if it does not exists in your definition file you cannot compile. Well according to me this is where it gets better. You are forced to consider your unsupported customizations. To solve this I created another definition file that I called “Xrm.unsupported.d.ts” and added just like I added the other definition file. Here you can add all of the methods definitions that you call. The really nice thing is that it’s all in one place. So if you, down the road, find a better solution than you have now you can find all the places that you have used your “hack” and change or remove it from the definition file and Visual Studio will prompt you where you need to change, before your typescript gets compiled to javascript that you can upload.

Typescript creates two sets of javascript files, one minified and one not. This allows you to quite easily change to minified if you would like.

This is so nice!

Posted in CRM 2011, Customizations, MS CRM | Tagged , , | 4 Comments

Active Mapping Syncronization

In Dynamics CRM a mapping in a relationship is just a way to speed up the process of creating sub entities. But what if you would like have a little bit more out of it. Say that you would like to have them cascading information down, so that when an address is updated on an account that same address is updated on all of the child contacts as well.
Note here that this is a one way update. Parent entity will update child entities and not the other way around.

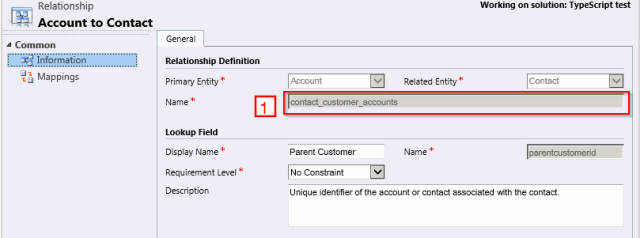
Let’s start with what we already have in Dynamics CRM. So take the Account to contact relationship and have a look.

First picture here it’s the relationship with the relationship name (1).
Relationship name

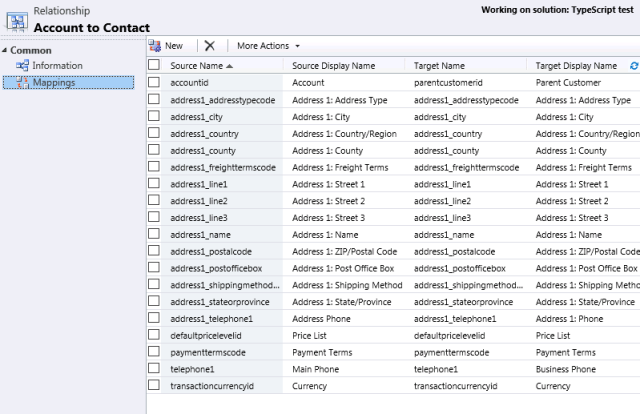
Then mapping of fields, and these are the fields to keep updated.Relationship mappings

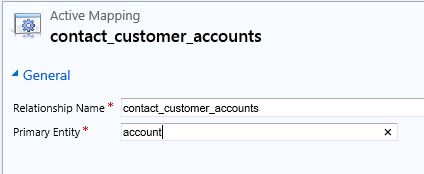
So we need a place to keep record of what needs to be updated, so create a new entity. I named it “Active Mapping”, with two string fields,

  • Name (or relationship name)
  • Primary entity

Active Mapping Form

When that’s done the rest is just code. No more information need to get this to work. So let’s get to it. I created a plugin using the developer toolkit but removed all the features that control when the plugin is fired. So I have a

LocalPluginContext localContext = new LocalPluginContext(serviceProvider);

But not much more.
So when the plugin has fired I want to start with getting all the “Active Mapping” entities that I created above matching my “primary enity”.

private static List<string> GetActiveMappings(LocalPluginContext localContext)
{
    QueryExpression activeMappingsQuery = new QueryExpression("mer_activemapping")
    {
        ColumnSet = new ColumnSet("mer_name"),
    };
    activeMappingsQuery.Criteria.AddCondition("mer_primaryentity", ConditionOperator.Equal, localContext.PluginExecutionContext.PrimaryEntityName);

    EntityCollection activemappings = localContext.OrganizationService.RetrieveMultiple(activeMappingsQuery);
    List<string> returnList = new List<string>();
    foreach (Entity activeMapping in activemappings.Entities)
    {
        if (activeMapping.Attributes.Contains("mer_name"))
            returnList.Add(activeMapping["mer_name"].ToString());
    }

    return returnList;
}

Now this will return a list of relationship names that are relevant to update.
With that list of names I need to get the details of this list of relationships:

private static List<OneToManyRelationshipMetadata> GetRelationshipDetails(LocalPluginContext localContext, List<string> relationshipNames)
{
    RetrieveEntityRequest retrieveEntityRequest = new RetrieveEntityRequest()
    {
        EntityFilters = EntityFilters.Relationships,
        RetrieveAsIfPublished = true,
        LogicalName = localContext.PluginExecutionContext.PrimaryEntityName,
    };

    RetrieveEntityResponse retrieveEntityResp = (RetrieveEntityResponse)localContext.OrganizationService.Execute(retrieveEntityRequest);
    List<OneToManyRelationshipMetadata> returnList = new List<OneToManyRelationshipMetadata>();

    foreach (OneToManyRelationshipMetadata relationshipMetadata in retrieveEntityResp.EntityMetadata.OneToManyRelationships)
    {
        foreach (string relName in relationshipNames)
        {
            if (relationshipMetadata.SchemaName.Equals(relName))
            {
                returnList.Add(relationshipMetadata);
            }
        }
    }

    return returnList;
}

When I have the actual relationships I need to get the attribute mappings list, so for each of the items in the returned list in the previous method I do:

private static List<InternalAttributeMap> GetChildAttributeMappings(LocalPluginContext localContext, string relatedentity)
{

    QueryExpression relationshipMappings = new QueryExpression("attributemap");
    relationshipMappings.ColumnSet.AddColumns("sourceattributename", "targetattributename");
    relationshipMappings.Criteria.AddCondition("parentattributemapid", ConditionOperator.Null);

    LinkEntity entityMap = new LinkEntity("attributemap", "entitymap", "entitymapid", "entitymapid", JoinOperator.Inner);
    entityMap.LinkCriteria.AddCondition("sourceentityname", ConditionOperator.Equal, localContext.PluginExecutionContext.PrimaryEntityName);
    entityMap.LinkCriteria.AddCondition("targetentityname", ConditionOperator.Equal, relatedentity);
    relationshipMappings.LinkEntities.Add(entityMap);

    EntityCollection attributeMaps = localContext.OrganizationService.RetrieveMultiple(relationshipMappings);
    List<InternalAttributeMap> attributeMappings = new List<InternalAttributeMap>();
    foreach (Entity attributeMap in attributeMaps.Entities)
    {
        attributeMappings.Add(new InternalAttributeMap(attributeMap["sourceattributename"].ToString(), attributeMap["targetattributename"].ToString()));
    }

    return attributeMappings;
}

I put all of them in a helper class to make life easier for me:

internal class InternalAttributeMap
{
    public InternalAttributeMap(string sourceattributename, string targetattributename)
    {
        this.SourceAttributeName = sourceattributename;
        this.TargetAttributeName = targetattributename;
    }

    public string SourceAttributeName { get; set; }
    public string TargetAttributeName { get; set; }
}

Note here that only source entity and target entity is needed, that means that CRM actually don’t have an attributes mapping per relationship. But have a common for each source-target pair. This means that if you have multiple relationships from one entity to another, and you change the attribute mapping for one of them, you have changed the attribute mapping for the other as well.
It’s easy to try. Change one of the account to opportunity mapping on account and then check the other.
Anyway, I have to remove the particular mapping that comprises the relationship, I don’t even want to try to change that field.

private static void RemoveSourceValue(List<InternalAttributeMap> list, string sourceAttributeName)
{
    foreach (InternalAttributeMap attribute in list)
    {
        if (attribute.SourceAttributeName.Equals(sourceAttributeName))
        {
            list.Remove(attribute);
        }
    }
}

Update the child entities:

private static void UpdateChildEntities(LocalPluginContext localContext, List<InternalAttributeMap> attributeMappings, string entity, string relationshipattribute)
{
    ColumnSet contactAttributes = new ColumnSet();
    ColumnSet campaignResonseAttributes = new ColumnSet();
    foreach (InternalAttributeMap attribute in attributeMappings)
    {
        contactAttributes.AddColumn(attribute.SourceAttributeName);
        campaignResonseAttributes.AddColumn(attribute.TargetAttributeName);
    }

    Entity primaryEntity = localContext.OrganizationService.Retrieve(localContext.PluginExecutionContext.PrimaryEntityName, localContext.PluginExecutionContext.PrimaryEntityId, contactAttributes);

    QueryExpression retreiveChildEntitiesQuery = new QueryExpression(entity);
    retreiveChildEntitiesQuery.Criteria.AddCondition(relationshipattribute, ConditionOperator.Equal, localContext.PluginExecutionContext.PrimaryEntityId);

    EntityCollection childEntitiesCollection = localContext.OrganizationService.RetrieveMultiple(retreiveChildEntitiesQuery);
    foreach (Entity childEntity in childEntitiesCollection.Entities)
    {
        foreach (InternalAttributeMap attribute in attributeMappings)
        {
            if (primaryEntity.Attributes.Contains(attribute.SourceAttributeName))
                childEntity[attribute.TargetAttributeName] = primaryEntity[attribute.SourceAttributeName];
            else
                childEntity[attribute.TargetAttributeName] = null;
        }
        localContext.OrganizationService.Update(childEntity);
    }
}

So when you have all the pieces just add them together:

public void Execute(IServiceProvider serviceProvider)
{
    // Construct the Local plug-in context.
    LocalPluginContext localContext = new LocalPluginContext(serviceProvider);

    List<string> relationshipsToUpdate = GetActiveMappings(localContext);

    List<OneToManyRelationshipMetadata> metadataInfos = GetRelationshipDetails(localContext, relationshipsToUpdate);
    foreach (OneToManyRelationshipMetadata relationship in metadataInfos)
    {
        List<InternalAttributeMap> attributeMappingsList = GetChildAttributeMappings(localContext, relationship.ReferencingEntity);
        RemoveSourceValue(attributeMappingsList, relationship.ReferencedAttribute);
        UpdateChildEntities(localContext, attributeMappingsList, relationship.ReferencingEntity, relationship.ReferencingAttribute);
    }
}

So this is still missing just one little thing. Just because users add a row to my custom entity “active mapping” there is no event to trigger the plugin. You can definitely do this also as a plugin to that entity itself and then create and remove events to the primary entities that exits, but this is where this solution ends. So for each primary entity that exists in the “active mapping” list you have to create an event yourself. But I think you can live with that.

Posted in Customizations, MS CRM, Plugin | Tagged , , | 1 Comment

Set a good Trace Log folder

When I started using the developer toolkit I noticed that I got a lot of errors in the event log of my server after I deployed the first plugin.

What I found was that the default CRM trace log file is not a good one, you have to change it on every installation to remove this error. It’s not hard it just annoying. The default is:

c:\crmdrop\logs

This is how you do it.

Open Power Shell and type:

Add-PSSnapin Microsoft.Crm.PowerShell
$setting = Get-CrmSetting TraceSettings
$setting.Directory="C:\Program Files\Microsoft Dynamics CRM\Trace"
Set-CrmSetting $setting
Get-CrmSetting TraceSettings

But note that this does’n actually change the trace log folder, this is just to remove the erros from the event log

Posted in CRM 2011, MS CRM | Tagged , | 2 Comments

Multi organization deploy: part 3 binding it together

Now for the third and final part of this multi organization tool I will bind all together and make it useful. First a quick look at the problem that I wanted to solve in the first place.

I wanted to have a tool that could connect to the same server and access all of the organizations and deploy solutions to them. However I wanted to have a bit control over the process so that I can choose which organizations to deploy to.

  • Lock users out of organization
  • Apply solution to specific organization
  • Be able to do things after solution is applied (migrations and others…)
  • Activate users again on organization

The more I though about it the more I realized that I have a tool that supports a lot of this, the plugin registration tool. So I decided that I might as well just tweak that and I will get a great tool.

There was a bit of cleaning away all the things that I did not need for this, so everything that actually has anything with registering a plugin had to go. However if you are doing this, this is not a required step, I just like to remove things I don’t need. Next up is the fun part, hijacking the tool.

The plugin registration tool is based on a simple UserControl, so start up with creating one. Then add just one constructor like this:

public ApplySolution(CrmOrganization org, MainForm mainForm)
{
    if (org == null)
    {
        throw new ArgumentNullException("org");
    }
    else if (org.Connection == null)
    {
        throw new ArgumentNullException("org.Connection");
    }

    InitializeComponent();

    this.m_org = org;
    this.m_con = org.Connection;
    this.m_mainForm = mainForm;
}

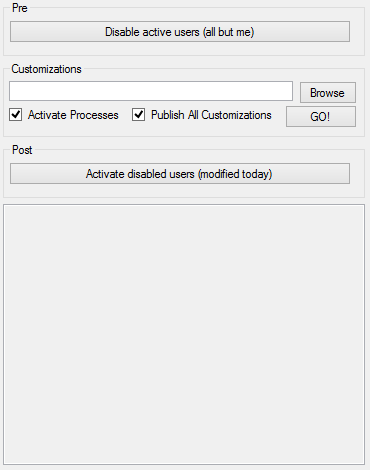
This it the look that I have chosen:

Apply Solution Plugin RegistrationIt’s simple and descriptive. You add the code from the first and the second blog entry and connect it to the buttons.

Now open OrganizationsForm in the plugin registration and change all references to “OrganizationControl” with the user control that you just created. In my case I named it “ApplySolution”. Search and replace it a great way for this (Ctrl + H in Visual Studio).

Apply Solution Plugin Registration in action

You click the one “disable active users”, now you are alone in your organization.
Browse your solution file and you can choose not to Activate Processes and Publish All Customizations when you import your file.
When all is done, activate the same users again.

Posted in CRM 2011, MS CRM, Tool | Tagged , , | Leave a comment